In today’s fast-paced development environment, efficiency and security are paramount. When working with private Git repositories, the continuous need to enter credentials can disrupt workflow and become a security concern.
Authentication lies at the core of accessing source code repositories, and for private instances on platforms like GitHub, GitLab, and Bitbucket, entering credentials such as usernames and passwords can become a cumbersome routine. In this article, we delve into four robust strategies that liberate developers from the need to repeatedly input credentials, paving the way for a more streamlined and secure Git experience.
What are the 4 Strategies for Passwordless Usage of Private Git Repositories?
Here are 4 strategies for passwordless usage of private Git repositories:
- Manual Entry: Username and Password in Clone Link
- Credential Caching: Utilizing credential.helper
- Token Authentication: Creating and Using Repository Tokens
- SSH Key Authentication: Adding and Using SSH Keys
1. Manual Entry: Username and Password in Clone Link
Streamlining the initial steps of repository interaction, one common method involves direct authentication by embedding the username and password into the clone link. To clone a repository, go to the repository, click the Code, and then copy the link by clicking the copy to clipboard icon as follows:
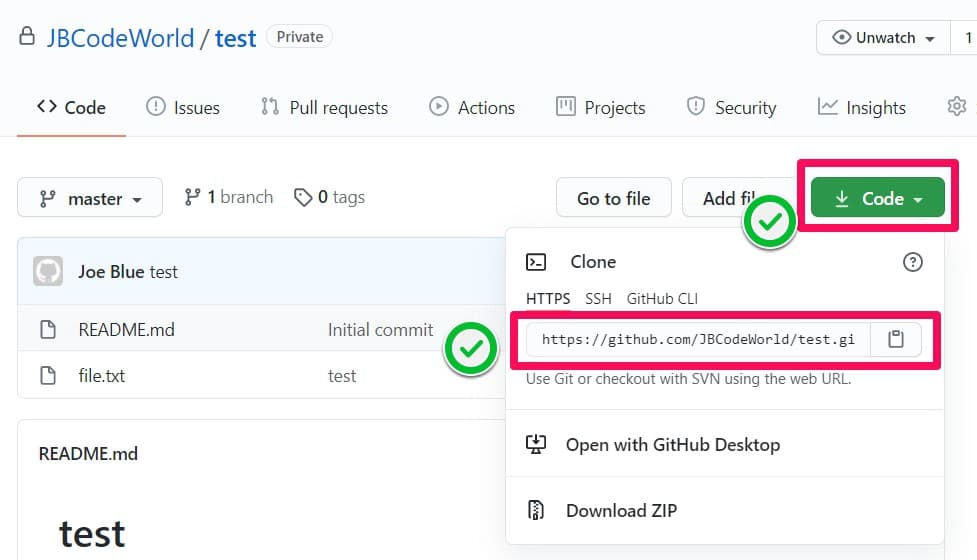
The copied link as follows:
https://github.com/JBCodeWorld/test.git
To clone the repo without the username and the password authentication, enter those values to the link as follows:
git clone https://username:password@github.com/JBCodeWorld/test.gitIf you already cloned ar checked out the repo, go to the path-to-repo/.git/config file and update URL accordingly with the username and the password .
[core]
 repositoryformatversion = 0
 filemode = true
 bare = false
 logallrefupdates = true
[remote "origin"]
 url = https://username:password@github.com/JBCodeWorld/test.git
 fetch = +refs/heads/*:refs/remotes/origin/*
[branch "master"]
 remote = origin
 merge = refs/heads/master
As you see, the credentials information exposed in command history and also not encrypted in the file, and only protected with routine user file permissions.
2. Credential Caching: Utilizing credential.helper
Solving the perpetual challenge of repeated credential input, another efficient approach involves the use of credential.helper to seamlessly cache Git credentials. The store option saves the credentials in a file named as ~/.git-credentials for each URL context. To activate this option,
$ git config credential.helper store
OR
$ git config --global credential.helper store
After that, on the first interaction with the repository, the credentials are retrieved from the user and stored as follows:
ubuntu@ubuntu:~/test$ git pull
Username for 'https://github.com': jbcodeworld
Password for 'https://jbcodeworld@github.com':
Already up to date.
ubuntu@ubuntu:~/test$
When ~/.git-credentials checked, the credentials are stored as unencrypted. The file is protected only by standard user file permissions.
ubuntu@ubuntu:~$ cat ~/.git-credentials
https://<user-name>:<password>@github.com
You can also store the credentials information in the memory for a certain amount of time. To activate this;
$ git config credential.helper cacheOR$ git config --global credential.helper cache
Again, in the first interaction with the repository, the credentials are retrieved from the user and stored in the cache as follows:
ubuntu@ubuntu:~/test$ git config --global credential.helper cache
ubuntu@ubuntu:~/test$ git pull
Username for 'https://github.com': jbcodeworld
Password for 'https://jbcodeworld@github.com':
Already up to date.
ubuntu@ubuntu:~/test$
The time unit for the cache is in seconds and default is 15 minutes. When this time elapsed, git will force you to enter your username and password again. You can overwrite the default as follows, for example, for one day (1 day = 24 hours × 60 minutes × 60 seconds = 86400 seconds);
$ git config --global credential.helper 'cache --timeout=86400'OR$ git config --global credential.helper 'cache --timeout=86400'
If you would like the daemon to exit early, forgetting all cached credentials before their timeout, you can issue an exit action:
git credential-cache exit3. Token Authentication: Creating and Using Repository Tokens
Thirdly, a token can be created at the repository and be used for authentication. To create the token, you can follow these steps;
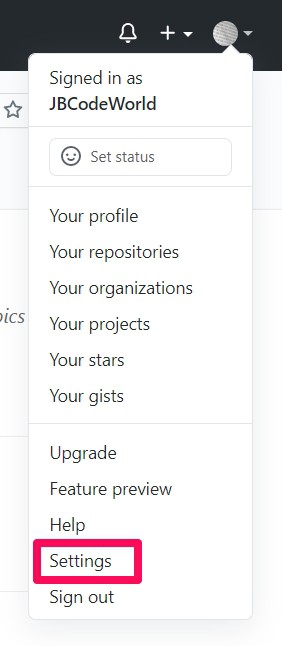
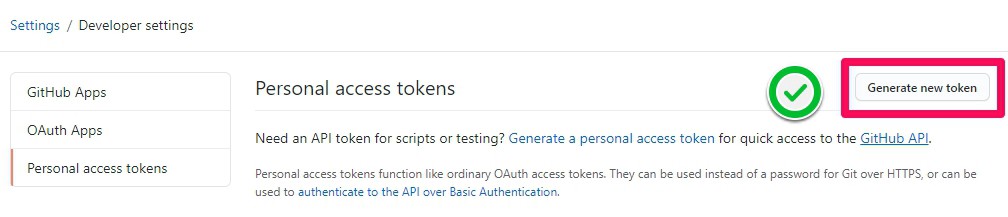
Step 1: In the upper-right corner of any page, click your profile photo, then click Settings
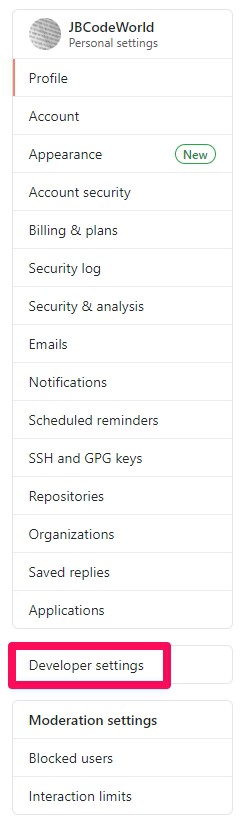
Step 2: In the left sidebar, click Developer Settings
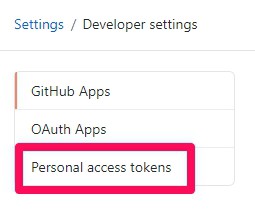
Step 3: In the left sidebar, click Personel access tokens.
Step 4: In the right-upper corner, click Generate new token
Step 5: If prompted, confirm your GitHub password.

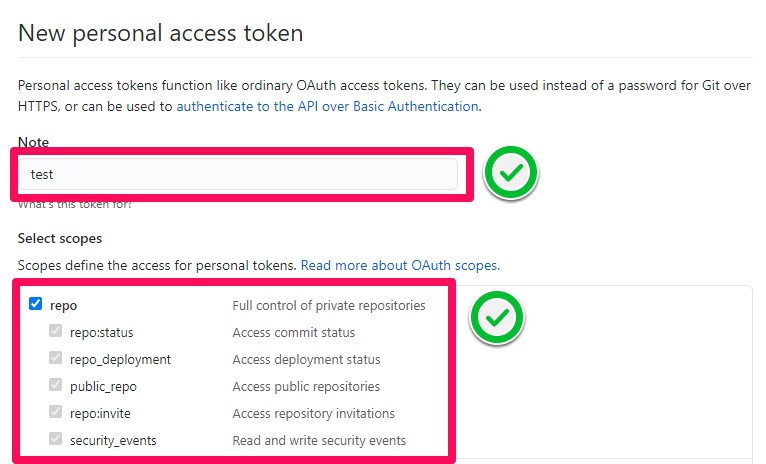
Step 6: Give your token a descriptive name.
Select the scopes, or permissions; you’d like to grant this token. To use your token to access repositories from the command line, select repo.
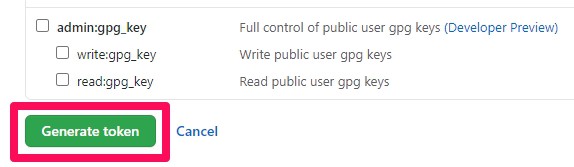
Step 7: Finally, click the Generate token button to generate the token
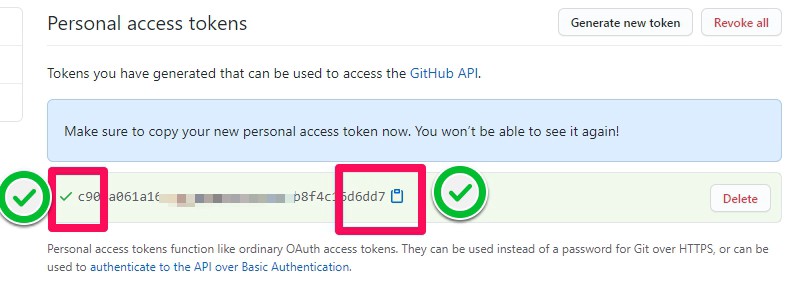
Step 8: Confirm the checkmark
Click the copy to clipboard icon to copy the token to your clipboard. For security reasons, after you navigate off the page, you will not be able to see the token again.
These are the steps to create the token successfully. After this, the token can be used at the git URL as in the first option. You can use the token when cloning like this;
git clonehttps://c904a061a164cb45a9abf5dbc6c8b8f4c16d6dd7@github.com/JBCodeWorld/test.git
If you have already cloned the repository, then you can update the URL in the .git/config file in the repository by placing the token between https:// and @github.com.
ubuntu@ubuntu:~/test$ cat .git/config
[core]
 repositoryformatversion = 0
 filemode = true
 bare = false
 logallrefupdates = true
[remote "origin"]
 url = https://c904a061a164cb45a9abf5dbc6c8b8f4c16d6dd7@github.com/JBCodeWorld/test.git
.....
After entering the token to the URL in the .git/config file, git will not ask for authentication anymore.
You can also follow the same step from the git documentation. (https://docs.github.com/en/authentication/keeping-your-account-and-data-secure/managing-your-personal-access-tokens)
4. SSH Key Authentication: Adding and Using SSH Keys
Elevating the realm of secure authentication, SSH key authentication stands as a robust solution for accessing private Git repositories without the need for constant password entry. This method involves adding and utilizing SSH keys, providing developers with a seamless and password-free pathway to interact with their repositories, thereby enhancing both convenience and security in the Git workflow.
A new SSH key can be added to your GitHub account and be used for authentication. To create the SSH key, go to your terminal and type;
ssh-keygen -t rsaWhen the command is entered, press enter key for all options. You can also enter a password, but we will not activate the password in this study. You will see a screen like this;
ubuntu@ubuntu:~$ ssh-keygen -t rsa
Generating public/private rsa key pair.
Enter file in which to save the key (/home/ubuntu/.ssh/id_rsa):
Enter passphrase (empty for no passphrase):
Enter same passphrase again:
Your identification has been saved in /home/ubuntu/.ssh/id_rsa.
Your public key has been saved in /home/ubuntu/.ssh/id_rsa.pub.
The key fingerprint is:
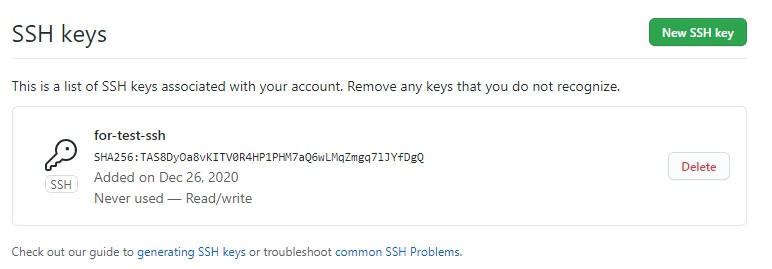
SHA256:TAS8DyOa8vKITV0R4HP1PHM7aQ6wLMqZmgq7lJYfDgQ ubuntu@ubuntu
The key's randomart image is:
+---[RSA 2048]----+
| .oo.o |
| . .+ o |
|E o o.o = . |
|. .o+= o + o |
| . o .o+S . = |
|o =o = .. + . |
|.O..* . |
|*==o. |
|*==o |
+----[SHA256]-----+
ubuntu@ubuntu:~$ssh-keygen will create two keys in the ~/.ssh folder. These are private id_rsa , and public id_rsa.pub keys.
ubuntu@ubuntu:~$ ls ~/.ssh
config  id_rsa  id_rsa.pub  known_hosts
ubuntu@ubuntu:~$
The contents of public key, id_rsa.pub, must be copied to the GitHub.
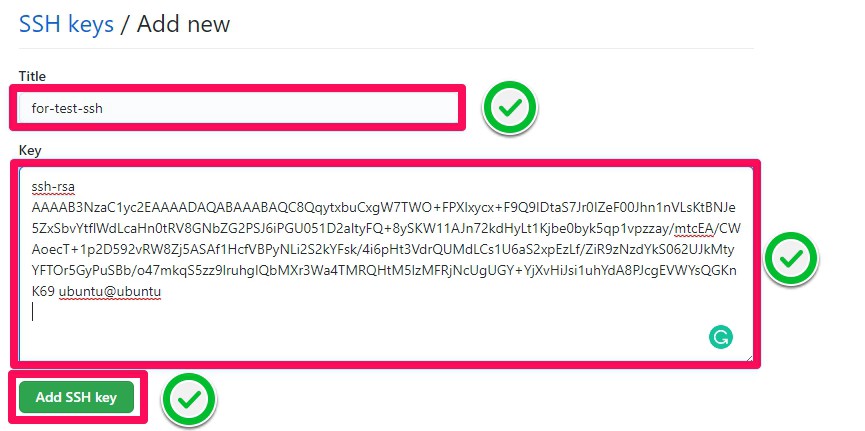
ubuntu@ubuntu:~$ cat ~/.ssh/id_rsa.pub
ssh-rsa AAAAB3NzaC1yc2EAAAADAQABAAABAQC8QqytxbuCxgW7TWO+FPXlxycx+F9Q9IDtaS7Jr0IZeF00Jhn1nVLsKtBNJe5ZxSbvYtflWdLcaHn0tRV8GNbZG2PSJ6iPGU051D2altyFQ+8ySKW11AJn72kdHyLt1Kjbe0byk5qp1vpzzay/mtcEA/CWAoecT+1p2D592vRW8Zj5ASAf1HcfVBPyNLi2S2kYFsk/4i6pHt3VdrQUMdLCs1U6aS2xpEzLf/ZiR9zNzdYkS062UJkMtyYFTOr5GyPuSBb/o47mkqS5zz9lruhgIQbMXr3Wa4TMRQHtM5lzMFRjNcUgUGY+YjXvHiJsi1uhYdA8PJcgEVWYsQGKnK69 ubuntu@ubuntu
After the creation of ssh keys, the steps at GitHub can be done as follows;
Step 1: In the upper-right corner of any page, click your profile photo, then click Settings.

Step 2: In the user settings sidebar, click SSH and GPG keys.
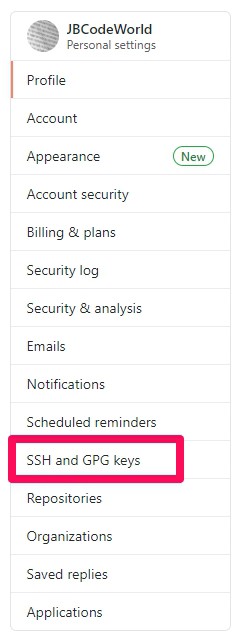
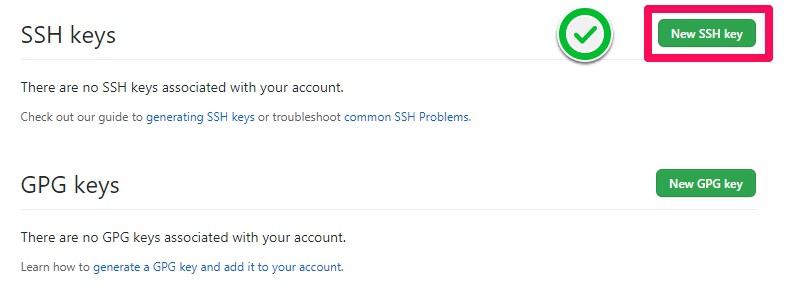
Step 3: Click New SSH key or Add SSH key.
Step 4: In the Title field, add a descriptive label for the new key. Paste the ~/.ssh/id_rsa.pub key content to the Key field. Click Add SSH key.
Step 5: If prompted, confirm your GitHub password.

Step 6: Verify that the key is added as follows.
After adding the public key to GitHub, git will not ask for authentication anymore. But for this, we have to do some settings in the configuration.
Firstly, let’s authenticate the connection with the command ssh -T git@github.com. You may see a warning like this:
ubuntu@ubuntu:~$ ssh -T git@github.com
The authenticity of host 'github.com (140.82.121.4)' can't be established.
RSA key fingerprint is SHA256:nThbg6kXUpJWGl7E1IGOCspRomTxdCARLviKw6E5SY8.
Are you sure you want to continue connecting (yes/no)? yes
Warning: Permanently added 'github.com,140.82.121.4' (RSA) to the list of known hosts.
Hi JBCodeWorld! You've successfully authenticated, but GitHub does not provide shell access.Secondly, to use GitHub with shell access, we must use shell syntax as follows;
git clone git@github.com:<url-repo>.gitIn our case;
git clone git@github.com:JBCodeWorld/test.git
Cloning into 'test'...
remote: Enumerating objects: 15, done.
remote: Counting objects: 100% (15/15), done.
remote: Compressing objects: 100% (9/9), done.
remote: Total 15 (delta 0), reused 6 (delta 0), pack-reused 0
Receiving objects: 100% (15/15), done.
If you have already cloned and worked on a repository, then you must redefine the ssh URL for remote origin in the repository:
git remote set-url origin git@github.com:<url-repo>.gitIn our case;
ubuntu@ubuntu:~/test$ git remote set-url origin git@github.com:JBCodeWorld/test.git
ubuntu@ubuntu:~/test$ git push
Counting objects: 3, done.
Delta compression using up to 2 threads.
Compressing objects: 100% (2/2), done.
Writing objects: 100% (3/3), 294 bytes | 294.00 KiB/s, done.
Total 3 (delta 0), reused 0 (delta 0)
To github.com:JBCodeWorld/test.git
   9b7e69d..2391466  master -> master
ubuntu@ubuntu:~/test$

You can also follow the same step from the git documentation. (https://docs.github.com/en/authentication/connecting-to-github-with-ssh/adding-a-new-ssh-key-to-your-github-account)
Conclusion
Regardless of the method chosen, eliminating the need to constantly enter passwords improves Git workflow and increases efficiency in the development process. Developers can streamline their workflow by implementing one of the passwordless authentication methods outlined in this guide. However, it is safer to use more secure options that do not expose credentials or make them harder to steal.
Last Updated on November 18, 2023