In today’s modern cloud environment, automation has become a crucial part of infrastructure management. Tools like Ansible simplifies complex tasks, making it easier for system administrators and DevOps engineers to maintain a reliable and secure computing environment. This comprehensive guide aims to demonstrate how you can leverage the power of Ansible to efficiently manage users, groups, and SSH connections, thereby streamlining your workflow and bolstering security.
From setting up Ansible on your controller machine, and arranging the host machines, to creating and authorizing users and groups, this guide has it all covered. We will also delve into the process of establishing secure SSH connections and managing them using Ansible playbooks. This step-by-step tutorial ensures a simplified approach for beginners while still offering valuable insights for seasoned users.
Let’s get dirty our hands and start our journey mastering Ansible for system management. By the end of this guide, you’ll be well-equipped to manage your systems with more efficiency.
Step-1: Install Ansible to Controller Machine
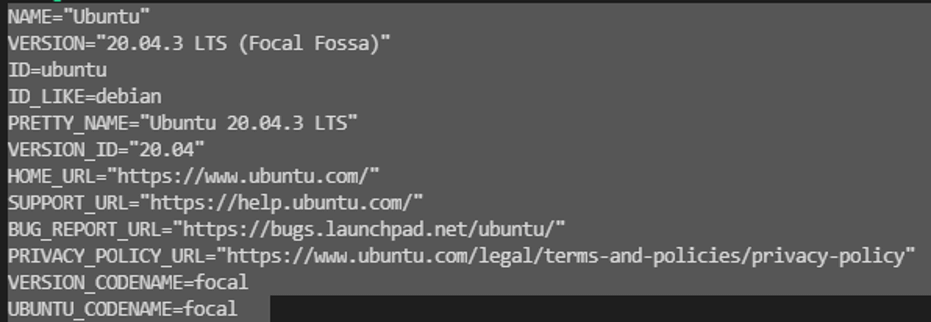
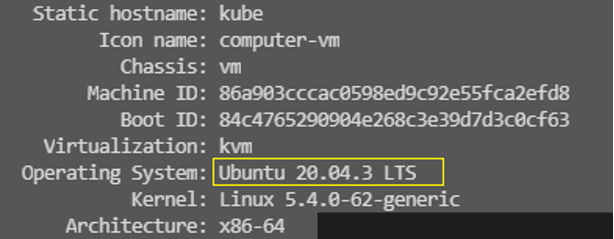
To install Ansible, you should first check the operating system of the machine because you have to use the correct commands for the operating system. For instance, you cannot use Amazon Linux commands for Ubuntu operating system. You can use the commands below to see which operating system you’re using.
cat /etc/os-release
hostnamectl
By the way, please mind if you work on the cloud, you need to connect to the controller server via ssh as below:
ssh -i <~/.ssh/your_pem_file> <username>@<public-ip>
Now, we can go back to work. As you see, the machine has Ubuntu operating system, and we have to use apt-get commands. You can find detailed information on Ansible documents as well.
suda apt-get update
suda apt-get upgrade
suda apt-get install ansible -y
ansible --version
![]()
config file = /etc/ansible/ansible.cfg
As you see, we finished setting up Ansible on the machine successfully.
Step-2: Arrange The Other Machines
Now, we need to go to the host file in Ansible to arrange the other machines. So, you need to enter the codes below:
cd /etc/ansible/
When you enter the “ls” command, you will see the “hosts” file. Please edit this file with any text editor like vim or nano with “sudo” as below:
sudo nano hosts
After you enter that code, the host file will be opened. At the bottom, you can add the machines which you want to manage as below:
ubuntuservers]
ubuntu-1 ansible_host= ansible_user=ubuntu
ubuntu-2 ansible_host= ansible_user=ubuntu

[linuxservers]
linux ansible_host= ansible_user=ec2-user

[all:vars]
ansible_ssh_private_key_file=/home/ubuntu/xxx.pem #enter the path of your pem file correctly
Please be careful about the user names. You have to enter ‘ubuntu’ for Ubuntu machines and ‘ec2-user’ for Amazon-linux machines. And finally, you have to enter your key-pem file name into the last line. Also, be careful about the correct path.
Now, you need to copy our key-pem file to the controller machine. While doing this step, do not forget to use the secure copy command for that.
scp -i xxx.pem xxx.pem ubuntu@<Public IP of controller>:/home/ubuntu
Please mind entering xxx.pem twice there. And also, watch the machine type again.
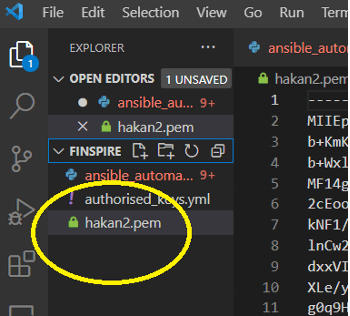
There is a second option if you are using VSCode. You can drop your key-pem into your working directory.
Now, you have to change the mod of the pem file with the code below:
chmod 400 xxx.pem
And now, you can check the connections between the controller and the other nodes.
There are two ways to do that. The first one is doing it by ad-hoc commands. (By the way, the ad-hoc commands are generally used for one time. If you need to use some scripts repeatedly, you must use playbooks.)
ansible -m ping all

And the second option is doing the same process using a ping playbook. You can create a playbook file as below:
#ansible ping to the servers with play-book
create ping.yml file as below with a text editor(vim, nano etc)
---
- name: ping all servers
  hosts: all
  tasks:
   - name: ping test
     ping:
Then, enter the code below.
ansible-playbook ping.yml
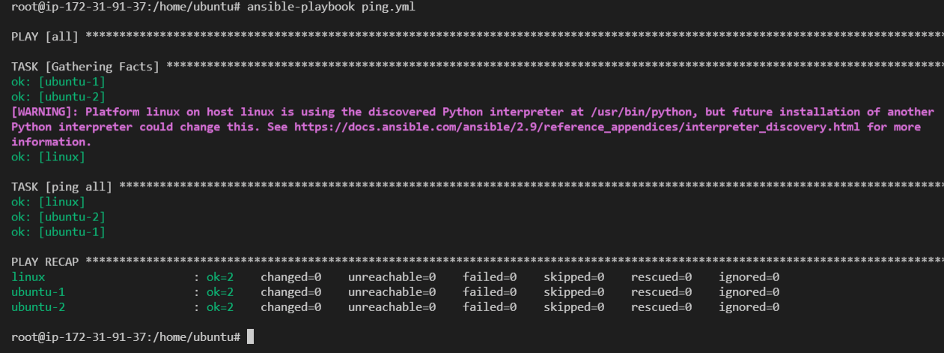
That is a great job! You can see the green lines and “ping” and “pong” and “success”. This means you have successfully set the connections between the controller and the nodes. So, you can manage the nodes from the controller now.
openssl req
  -newkey rsa:4096 -nodes -sha256 -keyout ./certs/domain.key
  -x509 -days 3650 -out ./certs/domain.crt
Step-3: Create Users and Groups
To create users and groups, first, you should create a playbook that makes users one by one.
#manual creating users as users.yml
nano users.yml
---
- name: creating users
  hosts: "*" #all is possible
  tasks:
   - user:
      name: name1
      state: present
      name: name2
      state: present
Please run the command as below.
ansible-playbook -b users.yml #mind -b for sudo
(we will see the sudo privileges in the playbook later)
After we run the playbook, we must check and see the users in the nodes.
You need to connect to a server and enter the command as below:
cat /etc/passwd
Please look at the bottom and see name1 and name2 users over there!
If you want to remove a user, you need to change “state: present” to “absent” and run the playbook again.
Second, let’s create another playbook that creates users with a loop.
#with items creating users as users.yml
---
- name: creating users with loop
  hosts: all
  become: true
  tasks:
   - user:
      name: "{{ item }}"
      state: present
     loop:
      - name1
      - name2
      - name3
      - name4
Now, you are ready to create users in a loop. So if you need to add another user, just add the name to the loop block. Please mind the “become: true” command. It provides Sudo privileges. So, you do not have to use –b in the command line. Just run the playbook and see the users on the server.
ansible-playbook users.yml
cat /etc/passwd
Now, Let’s create the groups in a loop.
---
- name: creating groups with loop
  hosts: all
  become: true
  tasks:
   - group:
      name: "{{ item }}"
      state: present
     loop:
      - group1
      - group2
And then run the code below.
ansible-playbook groups.yml
and see group1 and group2 in the server with the code below.
cat /etc/group
Step-4: Create ssh-keygen
Creating ssh-keygen forms the crux of this step, where you generate an SSH key pair as a remote user, and subsequently, add that key to the server using Ansible playbook. This step also involves making an SSH connection from a remote user to the server.
To start with, you need to generate the ssh-keygen on the remote user side. This is accomplished using the command "ssh-keygen". Upon executing this command, you will be prompted to input a password. For our purposes, you can leave this field empty and just press enter twice.
Next, you need to navigate to the “.ssh” directory. You can do this with the following code:
$ cd .ssh
~/.ssh
After you come to the “.ssh” directory, type “ls” and see “id_rsa” and “id_rsa.pub”. Since you did not enter any names for these files, these names are generic names. No worries, it is not a big deal.
Now, you need to copy your public key, which is “id_rsa.pub” to the controller machine. You have do it manually. In this step, the place where you copied the public key is very important. So, type that path to the “key” line in the playbook as below. Thanks to the “authorized_key” module in Ansible, you can easily send the public key to the nodes.
---
- name: ssh-connection
  hosts: all
  tasks:
    - authorized_key:
       user: name1
       state: present
       key: "{{ lookup('file', '/./user_pub_key') }}"
After you run that playbook, you must check if the public key is in authorized_keys or not. Please take a look at the picture below and check if your screen is the same:
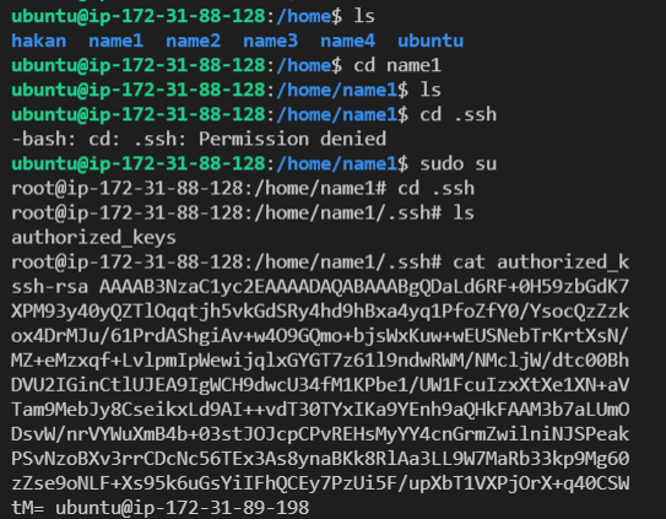
If everything is okay. Now, you need to go to the name1 directory which you created before and try to go “.ssh”. You might not do it due to root privileges. So, you have to use the “sudo su” command to go to the “.ssh” directory. Once you get there, finally you can see the public key with the “cat” command. After you saw the public key, there will be one last job to connect to the server.
ssh -i id_rsa name1@public-ip-of-the-server #name1 is important. Because we are coming from name1 user
That’s fantastic. You are in.
Now, Let’s add users to the groups. You need to use a module to do this process as below:
   - ansible.builtin.user:
      name: name1
      shell: /bin/bash
      groups: group1,group2
      append: yes

   - ansible.builtin.user:
      name: name2
      shell: /bin/bash
      groups: group2
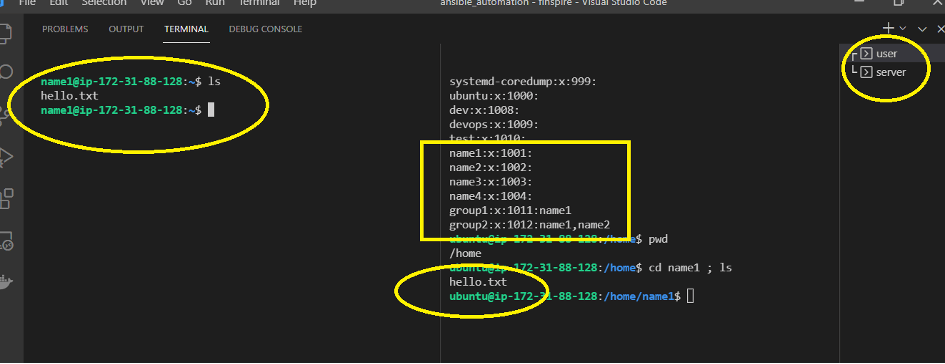
Finally, let us create a “hello.txt” file on the user side and see it on the server-side as below. You can also see the users and groups there.
At the end of the job, let me share the whole playbook as one block:
- name: creating users and groups and ssh connection
  hosts: "*" #all is possible
  become: yes
  tasks:
   - user:
      name: "{{ item }}"
      state: present
     loop:
      - name1
      - name2
      - name3
      - name4
   - group:
      name: "{{ item }}"
      state: present
     loop:
      - group1
      - group2

   - ansible.builtin.user:
      name: name1
      shell: /bin/bash
      groups: group1,group2
      append: yes

   - ansible.builtin.user:
      name: name2
      shell: /bin/bash
      groups: group2
      append: yes

   - authorized_key:
       user: name1
       state: present
       key: "{{ lookup('file', './user_id_rsa.pub') }}"

   - authorized_key:
       user: name2
       state: present
       key: "{{ lookup('file', './user_id_rsa.pub') }}"

// if you need the same process for other users, you can add this script to the main block
   # - authorized_key:
   #     user: name3
   #     state: present
   #     key: "{{ lookup('file', './user_id_rsa.pub') }}"
Nicely done, you have completed the whole task here. Hope you enjoy it.