Whichever language or technology you are using, it doesn’t matter; somehow, you will eventually meet with the terminal window’s black screen. But this time, you are luckier than before since many tools will make your journey more productive on those terminals. In this article, we’ll cover most of the major operating systems, including Windows 10, 8, and 7 from Microsoft, macOS from Apple, and Ubuntu variant of Linux.
Let’s define the roadmap of our development environment for those operating systems.
- First of all, we will install package managers on each OS, and then we will continue by installing git on our systems and make an initial setup for using git.
- We will then configure Git for Windows program in the Windows OS to use this program as our shell infrastructure. Non-windows users can skip this section since their OSes have built-in support for Unix/Linux shells.
- We will continue to install recommended fonts to our systems.
- And then, we will install/configure a terminal emulator in which we interact with command shells.
- In the end, we will configure our command shell.
- Beyond this section, there are “other tools” section recommended for increasing your productivity on the computer. Some parts of this journey may share common steps, and please follow each step one by one.
Let’s hands-on!
Package Manager
Users need to install, remove, upgrade, configure, and manage software packages. This is a time-consuming job. Linux distributions had package managers a long time ago. Package managers help the user install a correct compatible version of the desired software with its dependencies. You don’t have to consider downloading and installing third-party software to run the application flawlessly. Linux distributions usually have their own custom package managers, such as apt and apt-get for Ubuntu/Debian, yum and DNF for Fedora/Redhat and zypper for OpenSUSE, etc. On the macOS side, there is a third-party community tool called homebrew in shorthand brew. For the Windows family, there is also a community/proprietary tool named chocolatey and scoop. For Windows package management, we will choose Chocolatey.
Windows 10 and 8.1
Install Chocolatey

Chocolatey.org official page screenshot
- Open
powershell.exewith elevated rights (click start and typepowershell.exethen click the application withctrl+shiftpressed) - Now run the following command:
Set-ExecutionPolicy Bypass -Scope Process -Force; [System.Net.ServicePointManager]::SecurityProtocol = [System.Net.ServicePointManager]::SecurityProtocol -bor 3072; iex ((New-Object System.Net.WebClient).DownloadString('https://chocolatey.org/install.ps1'))
source: Chocolatey.org
Windows 7
Install Chocolatey manually
- Chocolatey.org now requires TLS 1.2 at a minimum. In Windows 7, we need to turn around this issue. Therefore we will install Chocolatey manually.
- The first step offline is to obtain a copy of the Chocolatey Nupkg (nupkg files are just fancy zip files). Download the latest version directly.
- Unzip it using any application that supports
zipformat. You can rename the downloaded file, e.g.:chocolatey.0.10.15.nupkg–>chocolatey.0.10.15.zipand extract the file using the windows explorer context menu. - Open
powershell.exewith elevated rights and navigate into the unzipped package’s tools folder.
PS C:\...\chocolatey.0.10.15\tools> .\chocolateyInstall.ps1
Note: This will not set Chocolatey as an installed package, so it may be a good idea also to call choco upgrade chocolatey -y and let it reinstall the same version, but at least it will be available for upgrades then.
source: Chocolatey.org
macOS
Install homebrew

/bin/bash -c "$(curl -fsSL https://raw.githubusercontent.com/Homebrew/install/HEAD/install.sh)"
Linux
- Ubuntu users may continue with Snap or Apt. Snap repositories seem updated more frequently than Ubuntu’s official repo. It is up to you.

Till now, we’ve covered package managers for major operating systems.
In the next article, we will install git on our computers.
Git

Developers use various tools for daily work, but for sure, git has the top priority. While working on projects, you are probably writing code for a ticket in a branch. Sometimes it becomes difficult to keep track of the branch and commit status. At the end of this article, you will see git status from the command prompt line on your terminal.
Windows 10, 8.1, and Windows 7
- Open
powershell.exeorcmd.exewith elevated rights, and run
choco install git -y
- or you can install it from https://gitforwindows.org/. To enhance the terminal experience, we need to Configure git for windows by integrating some msys2 packages.
macOS
brew install git
Linux
sudo apt install git -y
Setting up .gitconfig file
- This setup is platform-independent. You can either execute commands below or copy the .gitconfig file from the repository at the end of this article to your home directory and change relevant lines with your identity using a text editor.
git config - global user.name "Your Name"
git config - global user.email "youremail@example.com"
git config - global core.autocrlf input
git config - global core.eol lf
git config - global core.pager less -FRSX
git config - global init.defaultbranch main
git config - global color.branch auto
git config - global color.diff auto
git config - global color.interactive auto
git config - global color.status auto
git config - global color.ui auto
Configure Git for Windows

If it is not installed yet, you can install it with choco install 7zip -y on an elevated command prompt/or PowerShell, or you can download from https://www.7-zip.org/

For 64 bit Windows Systems (x86_64), How to check
- Download files below:
- Pacman, https://repo.msys2.org/msys/x86_64/pacman-5.2.2-4-x86_64.pkg.tar.xz
- keyring,https://repo.msys2.org/msys/x86_64/msys2-keyring-1~20201002-1-any.pkg.tar.xz
- repository mirror list, Pacman mirror list files
For 32 bit Windows Systems(x86):
- Download files below:
- Pacman, https://repo.msys2.org/msys/i686/pacman-5.2.2-4-i686.pkg.tar.xz
- keyring,https://repo.msys2.org/msys/x86_64/msys2-keyring-1~20201002-1-any.pkg.tar.xz
- repository mirror list, Pacman mirror list files
For both architecture:
- Open these files with elevated 7zip, since we are writing into the Git folder inside Program Files, and this folder is a system folder. There are one more archive files within Pacman and keyring files. Open inner ones and extract all folders and as well as mirrorlists.zip contents into git for windows directory (default folder is C:\Program Files\Git)
- Open
git-bash.exewith elevated rights :
set "PATH=%programfiles%\Git\usr\bin"
bash pacman-key --init
bash pacman-key --populate msys2
bash pacman-key --refresh-keys
pacman -Tv
pacman -Syuv --overwrite='*'
pacman --version
pacman -Sv --noconfirm --overwrite='*' bash
# this install might stuck at infinite loop, if so
# close git bash window and reopen it as elevated
# run the last command again
pacman -Sv --noconfirm --overwrite='*' rsync
pacman -Sv --noconfirm --overwrite='*' util-linux
source: https://github.com/Alexpux/MSYS2-pacman/issues/50#issuecomment-602141995
- Test if Pacman is working:
# tree command is not installed, run tree to check
  tree
  # so let's install
  pacman -S tree
  # test tree command as below
  tree -dL 2
  pacman -S zsh --overwrite='*' --noconfirm
  # we are also doing one of major installation at the line above 😉
Note: If you face any errors during installation of any package with Pacman, rerun the same install command with --overwrite='*' option
- To configure directory mount points, Open
git-bash.exewith elevated rights and runnano /etc/fstab
# modify the lines below "DO NOT REMOVE NEXT LINE"# DO NOT REMOVE NEXT LINE. It remove cygdrive prefix from path
none /mnt cygdrive binary,posix=0,noacl,user 0 0
# All drives will be mounted under /mnt eg /mnt/c /mnt/d just like in WSL
none /tmp usertemp binary,posix=0,noacl 0 0
/mnt/c/Users /home auto bind,binary,posix=0,noacl,user 0 0
# binding c:\Users to /home so user homedir will be /home/<user>
Save and exit nano editor with CTRL+X and confirm changes.
After a restart, open git bash, and type pwd; your user profile directory should be /home/<username>
Fonts
The fonts we are installing here are powerline symbols added fonts. These fonts are also known as NerdFonts. Please take a look at https://www.nerdfonts.com/. Here below, is the shorthand for downloading our preferred fonts. MesloLGS NF is the recommended font for the powerlevel10k theme. FiraCode is one of the most preferred coding editor fonts. FiraCode supports ligatures, joining adjacent characters as a single one for readability. Here below are the powerline patched ones. You can also use it for the terminal windows as well. It is up to you.
MesloLGS NF: download these four TTF files below and install your OS:
- MesloLGS NF Regular.ttf
- MesloLGS NF Bold.ttf
- MesloLGS NF Italic.ttf
- MesloLGS NF Bold Italic.ttf
Note: if you are a macOS user and using iterm2, the powerlevel10k setup p10k configure will automatically download MesloLGS NF fonts for you. Answer Yes when p10k asks you to install Meslo Nerd Font.
FiraCode NF: download these four TTF files below and install your OS:
- FiraCode NF Regular.ttf
- FiraCode NF Bold.ttf
- FiraCode NF Light.ttf
- FiraCode NF Medium.ttf
Windows users can install via choco install firacodenf -y as well.
Linux and macOS users need to set the terminal font as MesloLGS NF in their terminal app’s settings.
Terminal Emulator
We will enhance the terminal experience with terminal applications, fonts, and command shells with the help of zsh, its companion extension oh-my-zsh, and the shining powerlevel10k theme. In addition to this trilogy, syntax highlighting and auto-suggestion plugins on the terminal will boost your productivity.
– Windows 10
WSL Ubuntu 20.04 Setup
Before installing any Linux distributions on Windows, you must enable the “Windows Subsystem for Linux” optional feature.
Install the Windows Subsystem for Linux
- Open
powershell.exewith elevated rights and run the following commands:
dism.exe /online /enable-feature /featurename:Microsoft-Windows-Subsystem-Linux /all /norestart
dism.exe /online /enable-feature /featurename:VirtualMachinePlatform /all /norestart
Restart-Computer
- Set WSL 2 as your default version
wsl --set-default-version 2
This will require you to update the WSL Linux kernel you can download from Microsoft. If you dismissed to upgrade to version 2, it is not a big deal WSL still works, but version 2 is optimized compared to version 1. Later on, you can upgrade your Ubuntu WSL version by typing the command below:
wsl --set-version Ubuntu-20.04 2
If you installed different distribution, you can see which distributions are installed and their versions by typing: wsl -l -v
Install WSL Ubuntu from the Windows Store. (Ubuntu-20.04)


or download via PowerShell :
Invoke-WebRequest -Uri https://aka.ms/wslubuntu2004 -OutFile Ubuntu2004.appx -UseBasicParsing
or using curl:
curl -L -o Ubuntu-2004.appx https://aka.ms/wslubuntu2004
to install a manually downloaded appx package:
Add-AppxPackage .\Ubuntu2004.appx
Launch Ubuntu2004.exe and do initial user name and password stuff: (you will need this password when you need root access on WSL Ubuntu) (note: password entry is not visible, but it accepts while you are typing.)

Please follow Shell Setup to have zsh and oh-my-zsh and powerlevel10k theme trilogy on WSL Ubuntu.
Windows Terminal
- Install Windows Terminal from the Windows Store.


- or via PowerShell:
Invoke-WebRequest -Uri https://github.com/microsoft/terminal/releases/download/v1.4.3243.0/Microsoft.WindowsTerminal_1.4.3243.0_8wekyb3d8bbwe.msixbundle -OutFile wt.msixbundle -UseBasicParsing
Add-AppxPackage .\wt.msixbundle
Windows Terminal is configured for the build-in cmd.exe, powershell.exe, and WSL Ubuntu automatically. However, we still need to change default fonts and some stuff to beautify our terminal, and we also need to add git bash and git zsh entries to the Windows terminal settings file. Let’s do that.
For your convenience, before setting up the windows terminal, it is advised to install visual studio code; since you can use vscode to edit configuration easily, vscode will auto-complete while you are typing some values for the windows terminal. See Other Tools for installation details.
- Open the windows terminal app.

Open Windows Terminal settings.json , as seen above. Default editor will open the file. In the editor, find the "defaults": section and modify with the content below:
{
      "defaults": {
        // Put settings here that you want to apply to all profiles.
            "startingDirectory": "$HOME",
            "fontFace": "MesloLGS NF", // "JetBrainsMono NF"  // "FiraCode NF"
            "fontSize": 16,
            "fontWeight": "semi-light",
            "cursorColor" : "#FFFFFF",
            "cursorShape" : "bar",
            "historySize" : 9001,
            "padding": "6, 2",
            "backgroundImage": "%USERPROFILE%\\Pictures\\cwlogo106.png",
          // please copy this image from assets directory to your pictures folder
            "backgroundImageAlignment": "bottomRight",
            "backgroundImageStretchMode": "none",
            "backgroundImageOpacity": 0.5
      },
        "list":
        [
           {
                "guid": "{12396def-8d0e-4ab1-a9cf-3d842633ca92}",
               // this is a random hexadecimal guid number feel free to change whatever you want, keep the length same
               // please note that this numbers should be unique to each entry on windows terminal list here
               // and we will use this guid to address default shell at windows terminal start
                "closeOnExit" : true,
                "commandline" : "\"%PROGRAMFILES%\\git\\bin\\bash.exe\" --login -i -l -c 'exec zsh'",
                "startingDirectory": "$HOME",
                "icon" : "%PROGRAMFILES%\\git\\mingw64\\share\\git\\git-for-windows.ico",
                "name" : "Git Zsh"
            },           {
                "guid": "{45696bce-8d0e-4ab1-a9cf-3d842633ca92}",
                "closeOnExit" : true,
                "commandline" : "\"%PROGRAMFILES%\\git\\bin\\bash.exe\" --login -i -l",
                "cursorColor" : "#FFFFFF",
                "cursorShape" : "bar",
                "historySize" : 9001,
                "padding": "4, 4",
                "startingDirectory": "$HOME",
                "icon" : "%PROGRAMFILES%\\git\\mingw64\\share\\git\\git-for-windows.ico",
                "name" : "Git Bash"
            },
            {
                "guid": "{18c52f4f-de2c-5db4-bd2d-ba144ed6c273}",
                "hidden": false,
                "name": "Ubuntu-20.04 Zsh",
                "tabTitle": "Zsh",
                "icon": "%USERPROFILE%\\Pictures\\ubuntu1.png",
                // you may delete above line if you like Tux icon 🐧
                "commandline" : "wsl --distribution Ubuntu-20.04 zsh"
            },
            {
                "guid": "{07b52e3e-de2c-5db4-bd2d-ba144ed6c273}",
                "hidden": false,
                "name": "Ubuntu-20.04",
                "icon": "%USERPROFILE%\\Pictures\\ubuntu.png",
                // you may delete above line if you like Tux icon 🐧
                "source": "Windows.Terminal.Wsl"
            },
            {
                // Make changes here to the powershell.exe profile.
                "guid": "{61c54bbd-c2c6-5271-96e7-009a87ff44bf}",
                "name": "Windows PowerShell",
                "commandline": "powershell.exe -NoLogo",
                "colorScheme": "Campbell Powershell",
                "hidden": false
            },
            {
                // Make changes here to the cmd.exe profile.
                "guid": "{0caa0dad-35be-5f56-a8ff-afceeeaa6101}",
                "name": "Command Prompt",
                "commandline": "cmd.exe /k cls",
                "hidden": false
            },
            {
                "guid": "{b453ae62-4e3d-5e58-b989-0a998ec441b8}",
                "hidden": true,
                "name": "Azure Cloud Shell",
                "source": "Windows.Terminal.Azure"
            }
        ]
 },
And also, we need to modify the default profile line addressing whichever we want:
"defaultProfile": "{12396def-8d0e-4ab1-a9cf-3d842633ca92}",
 // please note that this is git zsh entry's guid number we set in the settings.json file above.
 // if you modified the guid number, make sure to set the same value here as well
Save the settings.json file. If there are syntax errors, e.g., comma, double quote, parenthesis, windows terminal will warn you about this. If no errors, then the windows terminal will refresh itself with the settings we just did. You can change these options any time by editing the settings file.
Note: To see the windows terminal’s default options, hold Alt key while clicking the windows terminal window’s setting. You may take a look at all default values for the terminal.

You can download the official Ubuntu icon file here: Ubuntu Circle of Friends set for web (513 KB)

Windows 8.1 and Windows 7
Install Cmder Mini

- Open
powershell.exeorcmd.exewith elevated rights, and run
choco install cmdermini -y

or download cmder mini from cmder web site: https://cmder.net/
- Configure Cmder Mini
This part is very complex due to the Cmder setting panel. We will try to simplify as much as we can. Here below an animated gif for the cmder mini initial setup. For advanced setup, you may take a look at every item in the settings window.

Cmder mini should be installed in the folderC:\tools\cmdermini. If you installed in a different location, change the relevant setting accordingly.
You may want to copy either these symbols: ⚡ 👑 or whatever you like as the admin indicator symbol.
You can set each profile in the Cmder mini tasks section of the startup directory to any directory you want, e.g., home directory.
Note: If you cannot see MesloLGS NF font on the command prompt font settings, after installing it, you can register the font using the Cmder mini settings as seen below.
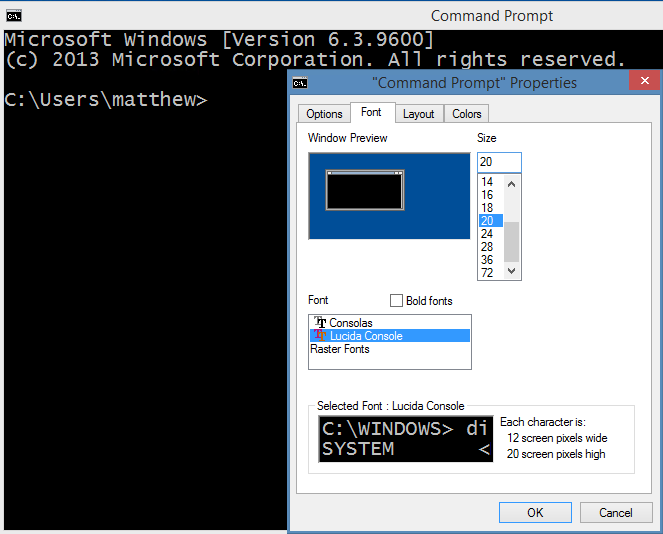

Cmder Mini register font as console TrueType font

To continue setting zsh up, you may jump to the “Install Oh-my-zsh” on Shell Setup.
macOS
Install iterm2.

brew install iterm2
Or download iterm2 from its website: https://iterm2.com/.
macOS comes with stock “Terminal.app”, but it is recommended to install iterm2.
On preferences, change the terminal font to “MesloLGS NF” it is done.
Linux
No need to install a terminal emulator. You can use the stock Gnome Terminal.
Shell Setup
Zsh is the very customizable shell in Unix platforms, Thanks to msys2 implementation on Git for Windows, and Linux virtualization on Windows Subsystem for Linux, in short WSL. You can have the pleasure of this shell on the Windows platform too. Windows 10 has a shiny Windows Terminal application. Windows 8 and 7 users, don’t worry. There is an almost similar alternative to the Windows Terminal app for you. It is Cmder. We will install this terminal client for Windows 7, and 8.1 systems. Windows 10 users can also give it a try if they’d like to.
– Install zsh
- Windows 10
Open git-bash.exe with elevated rights, and runpacman -S zsh --noconfirm --overwrite='*'.
Please note that to run the above command, you should have configured git for windows.
Open Windows Terminal from the start menu, and select Ubuntu 20.04 from the list at the tab bar of the application, update WSL Ubuntu repository database, and pre-installed applications by typing the following command on Ubuntu console:
sudo apt update && sudo apt upgrade -y && sudo apt autoremove -y
And run sudo apt install zsh -y
Please note that you should have installed WSL Ubuntu and configured Windows Terminal on Terminal Emulator Windows 10 Section to run the above command.
Changing directory colors:

Directory colors seem inverted on WSL Ubuntu in the Windows partition.
Please check ls output colors in NTFS partitions, e.g., your user profile directory on Windows. You may see some file’s colors as inverted when you run ls command. The default colors used in ls command, we have some bad background highlighting issues. Let’s fix that. Open Ubuntu-20.04 app
Create a .dircolors file as follows: dircolors -p > ~/.dircolors
You now have a .dircolors file containing the color configuration tols command, stored in the env variable LS_COLORS. We need to make a change to the colors and save them back to LS_COLORS.
Runnano ~/.dircolors And modify with the settings below. We’re removing the background from OTHER_WRITABLE and fixing the font color for the rest:
Change SETUID to: SETUID 00;30;41
Change SETGID to: SETUID 00;30;43
Change CAPABILITY to: CAPABILITY 00;30;41
Change STICKY_OTHER_WRITABLE to: STICKY_OTHER_WRITABLE 00;30;42
Change OTHER_WRITABLE to: OTHER_WRITABLE 01;32
Change STICKY to: STICKY 00;30;44
Save and exit CTRL+Xand confirm changes.
To make these settings permanent on our shell, we need to add the line below. Edit nano ~/.zshrc and add the following line: please note to the backticks (`) not single quote(‘)
eval `dircolors ~/.dircolors`
or execute the following command:
sed -i '0,/^$/s//\neval `dircolors ~\/.dircolors`\n/g' ~/.zshrc
Please note that: .zshrc file is per user settings file for zsh, .bashrc is for bash, respectively.
- Windows 7, 8.1
Open git-bash.exe with elevated rights, and runpacman -S zsh --noconfirm --overwrite='*'
Please note that to run the above command, you should have configured git for windows.
- macOS
macOS Catalina and beyond comes with zsh as the default shell. However, it is recommended to upgrade stock zsh via homebrew for your convenience. For macOS Mojave, you need to install zsh.
Open terminal.appor iterm2.appfrom the launchpad or in spotlight via Command + spacebar and type iterm or terminal and in the terminal window run brew install zsh
- Linux
Open the terminal app and run sudo apt install zsh -y
– Install oh-my-zsh
Installation instructions in this section apply to all operating systems. Please be advised that you need to complete git for windows installation for windows systems and its configuration mentioned above.
Run the following command at bash/zsh shell terminal:
sh -c "$(curl -fsSL https://raw.githubusercontent.com/robbyrussell/oh-my-zsh/master/tools/install.sh)"
This will clone the repository and replace the existing ~/.zshrc one with a template from oh-my-zsh
The install might have asked you to make zsh *as your Login Shell. Due to the implementation of shell on Git Bash, the chsh command is not available on git for windows bash. We will turn around this issue later on.
Except for Git Bash, feel free to change your login shell for zsh when asked or via running the command: chsh -s $(which zsh) This setting is user-specific, no need to prefix sudo
Install plugins:
Run the following command to download zsh-autosuggestions:
git clone https://github.com/zsh-users/zsh-autosuggestions.git $ZSH_CUSTOM/plugins/zsh-autosuggestions
This plugin will give instant suggestions in dimmed color while you type in zsh shell.
Run the following command to download zsh-syntax-highlighting:
git clone https://github.com/zsh-users/zsh-syntax-highlighting.git $ZSH_CUSTOM/plugins/zsh-syntax-highlighting
This plugin will highlight correctly typed commands with green, wrong ones with red instantly as you type in the zsh shell.
Install powerlevel10k theme on oh-my-zsh and save into user profile:

The Powerlevel10k repository on Github
Run the following command on bash/zsh shell terminal windows on your computer:
git clone --depth=1 https://github.com/romkatv/powerlevel10k.git ${ZSH_CUSTOM:-$HOME/.oh-my-zsh/custom}/themes/powerlevel10k
Open your git bash terminal, and in the terminal, execute the following commands to set your zsh theme to powerlevel10k and activate plugins just installed above:
sed -i 's/ZSH_THEME="robbyrussell"/ZSH_THEME="powerlevel10k\/powerlevel10k"/g' ~/.zshrc
sed -i 's/plugins=[(]git[)]/plugins=(git zsh-autosuggestions zsh-syntax-highlighting)/g' ~/.zshrc
or you may run nano ~/.zshrc in the terminal, find the line below and manually replace it with the second line(if you ran the two lines above, it is already done 😉):
ZSH_THEME="robbyrussell" ZSH_THEME="powerlevel10k/powerlevel10k"

and manually change the line for plugins as below:
plugins=(git) plugins=(git zsh-autosuggestions zsh-syntax-highlighting)

Save and exit the nano editor with CTRL+X and confirm changes.
Run the commandsource ~/.zshrc to update your terminal settings. Powerlevel10K initial setup p10k configure command will check some symbol’s visibility and configure the look and feel as your preference. The recommended font for the terminal is MesloLGS NF. Download the links above. For further details, please visit the Powerlevel10k repository.
My preferred powerlevel10k setup is as follows: ( You can reconfigure any time by p10k configure) Give it a try which combination you like.
- Prompt Style 👉 (1) Lean
- Character Set 👉 (1) Unicode
- Prompt Colors 👉 (1) 256 colors
- Show current time? 👉 (1) No.
- Prompt Height 👉 (2) Two lines.
- Prompt Connection👉 (1) Disconnected
- Prompt Frame👉 (1) No frame.
- Prompt Spacing👉 (1) Compact.
- Icons 👉 (2) Many icons.
- Prompt Flow👉 (1) Concise.
- Enable Transient Prompt 👉 (y) Yes.
- Instant Prompt Mode 👉 (2) Quiet
- Final confirmation 👉 (y) Yes.
Note: At the integrated terminal on visual studio code in Windows 7, you may see redundant percent sign (%) on some terminals above the current prompt line.
To solve this redundancy, enter the following lines of commands in git bash or zsh shell:
sed -i '0,/^$/s//\nsetopt PROMPT_CR\nsetopt PROMPT_SP\nexport PROMPT_EOL_MARK=""\n/g' ~/.zshrc
or you can manually add the below lines into ~/.zshrc file just after p10k-instant-prompt block below:
setopt PROMPT_CR
setopt PROMPT_SP
export PROMPT_EOL_MARK=""

source: https://superuser.com/a/645612
In the end, you will see a terminal screen like the ones below. Notice the difference at the same path with the zsh, oh-my-zsh, and powerlevel10k trilogy and with the bare bash shell.


Powerlevel10k zsh vs. bare bash console in windows 10 on WSL Ubuntu-20.04 at windows terminal

Other Tools
Install Openssh (Windows 8.1 and 7 only, others have by default)
Open powershell.exe or cmd.exe with elevated rights, and run
choco install openssh -y
For Windows 10, you can install the OpenSSH-server package from either with the above command or with optional features in settings(not in the control panel) as well as using PowerShell.
Install Visual Studio Code (vscode)
- Windows:
Open powershell.exe or cmd.exe with elevated rights, and run
choco install vscode -y
- Linux (Ubuntu):
snap install vscode - classic
- macOS:
brew install - cask visual-studio-code
You can also download visual studio code from Microsoft:
Vscode Configuration
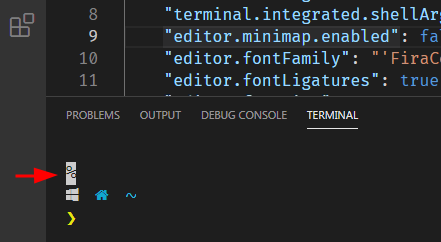
Let’s configure vscode integrated terminal on windows to use git zsh. Open vscode, then bring up settings, and then click on the upper right icon to see settings.json in text mode.
{
 "editor.fontFamily": "'FiraCode NF','JetBrains Mono', Consolas, 'Courier New', monospace",
 "editor.fontSize": 16,
 "editor.lineHeight": 24,
 "editor.fontWeight": "400",
 "editor.fontLigatures": true,
 "editor.renderWhitespace": "none",
 "editor.suggestSelection": "first",
 "editor.minimap.enabled": false,
 "editor.cursorStyle": "line-thin",
 "editor.wordWrapColumn": 120,
 "editor.wordWrap": "wordWrapColumn",
 "editor.mouseWheelZoom": true,
 "editor.formatOnSave": true,
 "editor.formatOnPaste": true,
 "breadcrumbs.enabled": true,
 "terminal.integrated.fontFamily": "MesloLGS NF",
 "terminal.integrated.fontSize": 18,
 "terminal.integrated.cursorStyle": "line",
 "terminal.integrated.cursorBlinking": true,
 "terminal.integrated.env.windows": {"TERM": "xterm-256color"},
 "terminal.integrated.shell.windows": "C:\\Program Files\\Git\\bin\\bash.exe",
 "terminal.integrated.shellArgs.windows": [" - command=../usr/bin/zsh.exe", "-i"],
 "terminal.integrated.cwd": "${fileDirname}",
 "terminal.integrated.drawBoldTextInBrightColors": false,
 "terminal.integrated.enableBell": true,
 "terminal.integrated.fontWeight": "300",
 "terminal.integrated.fontWeightBold": "400",
 "terminal.integrated.mouseWheelScrollSensitivity": 2,
 "terminal.integrated.scrollback": 5000,
 "window.zoomLevel": 0,
}

Screen capture tools
- Windows
choco install lightshot -y
Note: Flameshot package is not available on chocolatey. You need to install it manually from its repository.
- Linux(Ubuntu)
snap install flameshot # or sudo apt install flameshot
You can download flameshot binaries from the official website:

Please note that you may see the below note on the flameshot repository releases page.
“Current Windows Binaries are not signed, but it will be uploaded here once they are available.”
However, windows binaries can be downloaded from the previous release.
- macOS
brew install lightshot
You can download lightshot from its website:

If you successfully applied the settings explained in this article, You should be using zsh as a shell with oh-my-zsh and powerlevel10k and some helper plugins installed; you should see a beautiful shell command prompt in your terminal applications.
You can also access this content from the Github repository: https://github.com/cwmatthew/clarusway-devenv