Photo by Mimi Thian on Unsplash
The Compose is a tool for defining and running multi-container Docker applications. With Compose, you use a YAML file to configure your application’s services. Then, with a single command, you create and start all the services from your configuration.
Compose works in all environments: production, staging, development, testing, as well as CI workflows.
Using Docker Compose is basically a three-step process:
1. Define your app’s environment with a Dockerfile so it can be reproduced anywhere.
2. Define the services that make up your app in docker-compose.yml so they can be run together in an isolated environment.
3. Run docker-compose up and Compose starts and runs your entire app.
Common use cases of Docker Compose:
Compose can be used in many different ways. Some common use cases are outlined below.
-
Development environments
When you’re developing software, the ability to run an application in an isolated environment and interact with it is crucial. The Compose command-line tool can be used to create the environment and interact with it.
The compose-file provides a way to configure all of the application’s service dependencies (databases, queues, caches, web service APIs, etc). Using the Compose command-line tool you can create and start one or more containers for each dependency with a single command ( docker-compose up).
Together, these features provide a convenient way for developers to get started on a project. Compose can reduce a multi-page “developer getting started guide” to a single machine-readable compose-file and a few commands.
-
Automated testing environments
An important part of any Continuous Deployment or Continuous Integration process is the automated test suite. Automated end-to-end testing requires an environment in which to run tests. Compose provides a convenient way to create and destroy isolated testing environments for your test suite. By defining the full environment in a compose-file, you can create and destroy these environments in just a few commands.
-
Single host deployments
Compose has traditionally been focused on the development and testing workflows, but with each release, docker-compose is making progress on more production-oriented features.
Let’s build a web application by using docker-compose;

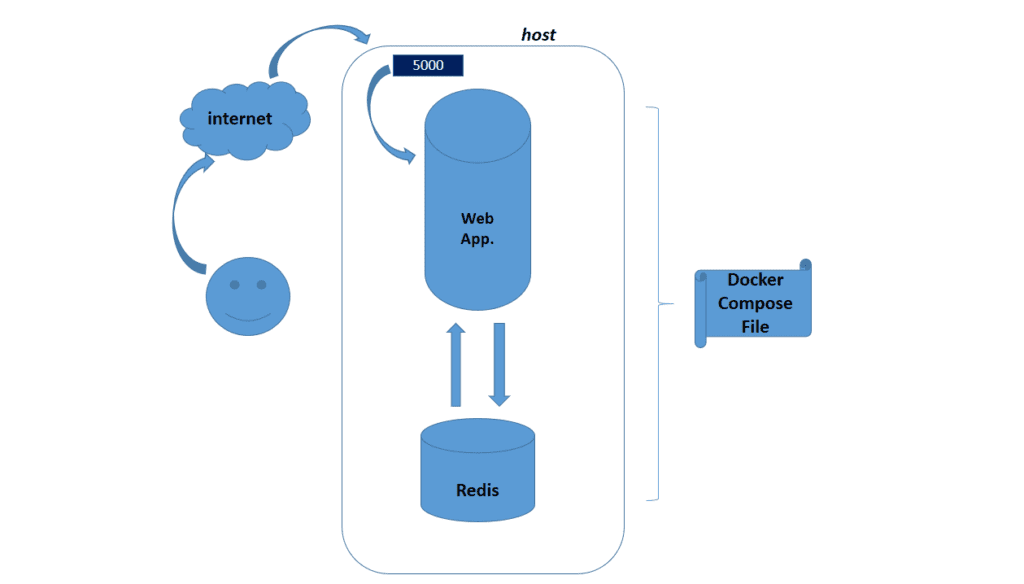
We actually can run two containers with a single command in a single host that is shown above and below;

Let’s prepare our structure step by step;
1.Step: Spin up an AWS EC2 instance that will provide permission to SSH from 22 port and also open 6379 and 5000 ports from the security groups.

sudo yum update -y
sudo amazon-linux-extras install docker -y
sudo systemctl start docker
sudo systemctl enable docker
sudo usermod -a -G docker ec2-user
3.Step: For Linux systems, after installing Docker, you need to install Docker Compose separately. But, Docker Desktop App for Mac and Windows includes “Docker Compose” as a part of those desktop installs. We will download the current stable release of the “Docker Compose” executable.
sudo curl -L
"https://github.com/docker/compose/releases/download/1.26.2/docker-compose-$(uname -s)-$(uname -m)" \
-o /usr/local/bin/docker-compose
Apply executable permissions to the binary.
sudo chmod +x /usr/local/bin/docker-compose
Check if the “Docker Compose” is working.
docker-compose --version
If you are getting the same result that is shown below, you successfully downloaded Docker Compose.

4.Step: Building a web application by using Docker Compose; create a folder for the project and work under that folder.

5. Step: Create a file called `app.py` in your project folder and paste the following python code in it. In this example, the application uses the Flask framework and maintains a hit counter in Redis, and `redis` is the hostname of the `Redis container` on the application’s network. We will use the default port for Redis, `6379`.
import timeimport redis
from flask import Flaskapp = Flask(__name__)
cache = redis.Redis(host='redis', port=6379)def get_hit_count():
    retries = 5
    while True:
       try:
           return cache.incr('hits')
       except redis.exceptions.ConnectionError as exc:
     if retries == 0:
         raise exc
     retries -= 1
     time.sleep(0.5)@app.route('/')
def hello():
    count = get_hit_count()
    return 'Hello World! I have been seen {} times.\n'.format(count)
6. Step: Create another file called `requirements.txt` in your project folder, add `flask` and `redis` as package list.
echo '
flask
redis
' > requirements.txt
7. Step: Create a Dockerfile which builds a Docker image in your project folder.
The image contains all the dependencies for the application, including Python itself.:
* Build an image starting with the Python 3.7 image.
* Set the working directory to `/code`.
* Set environment variables used by the flask command.
* Install gcc and other dependencies
* Copy `requirements.txt` and install the Python dependencies.
* Add metadata to the image to describe that the container is listening on port 5000
* Copy the current directory `.` in the project to the workdir `.` in the image.
* Set the default command for the container to flask run.
echo '
FROM python:3.7-alpine
WORKDIR /code
ENV FLASK_APP app.py
ENV FLASK_RUN_HOST 0.0.0.0
RUN apk add --no-cache gcc musl-dev linux-headers
COPY requirements.txt requirements.txt
RUN pip install -r requirements.txt
EXPOSE 5000
COPY . .
CMD ["flask", "run"]
' > Dockerfile
8.Step: Create a file called “docker-compose.yml” in your project folder.
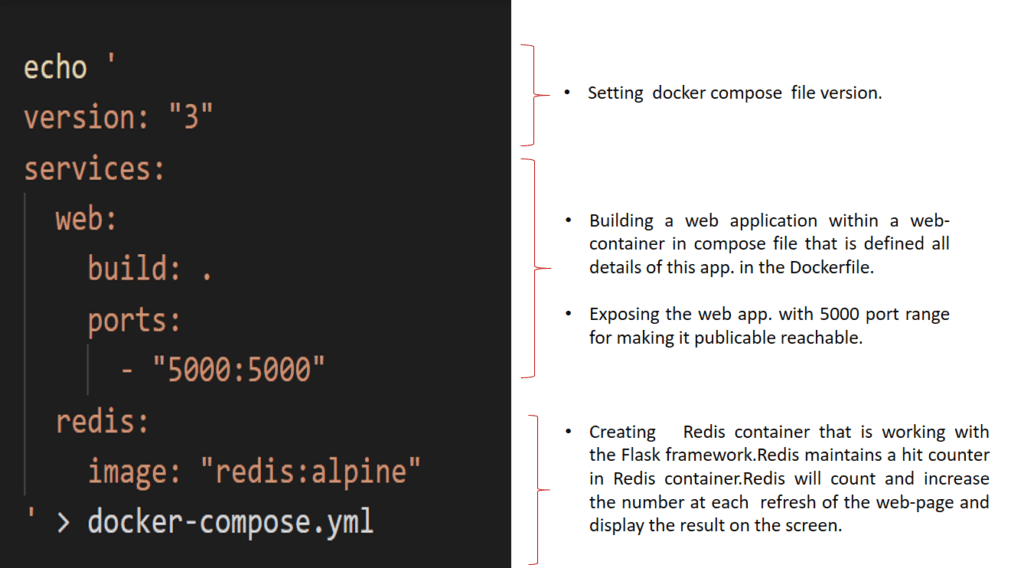
echo '
version: "3"
services:
web:
build: .
ports:
- "5000:5000"
redis:
image: "redis:alpine"
' > docker-compose.yml
9. Step: Finally you will have just four yaml file that is shown below.

10.Step: Everything is ready and now is action time. Type the command “docker-compose up” on your terminal.
11.Step: Enter http://”ec2-host-name”5000/ in a browser to see the application is running.Whenever you refresh your browser, the counter will increase the result number.That means that your service in the container is up and running.


12.Step: Press `Ctrl+C` to stop containers, and run `docker ps -a` to see containers created by Docker Compose.


13.Step: Remove the containers with “docker-compose down “ command.
Useful commands for Docker-Compose:
1. Verify the installation with the command:
docker-compose version
2. Print list of information about running containers from current docker-compose.yaml
docker-compose ps
3. Terminal into the docker container
docker exec -it :container_id bash
4. Run the docker container in debug mode
docker-compose run --service-ports web
5. Start the docker container
docker-compose up
6. Start the docker container in the background
docker-compose up -d
7. Remove all docker containers in the repository
docker-compose down
8. Remove a specific docker container
docker kill :container_id
Wrap
That’s the conceptual framework. I clarified some of the terms you’ll see in the Docker-compose ecosystem.
Hopefully this overview has helped you better understand the Docker-compose landscape. I also hope it has also opened your eyes to the value of metaphors in understanding new technologies.
If you found this helpful please share it on your favorite social media so other people can find it, too.


